There was this one rainy afternoon when I finally cracked the code on Easy Yaki Onigiri, and let me tell you, it was magic on a plate. I had been tinkering with grilled rice balls for a while, chasing that perfect crispy crust balanced with a tender, flavorful center. The moment I brushed my soy sauce onigiri with just the right glaze, dropped it onto the hot skillet, and heard that satisfying sizzle, I knew I had stumbled onto something special. That first bite, with its smoky char and savory soy undertones, hooked me instantly!
What makes this Easy Yaki Onigiri version stand out is the simplicity mixed with a punch of umami flavor. It’s all about the rice ball grilling technique that creates those irresistible crispy bits without any fuss. Plus, the soy sauce glaze I use is a game-changer — it caramelizes beautifully, adding layers of depth without complicated steps or rare ingredients. Whether you’re a longtime onigiri fan or new to Japanese snacks, this recipe offers a welcoming flavor adventure that’s totally approachable.
If you’re ready for a fun, bold twist on the classic rice ball, your kitchen adventure starts right here. These Easy Yaki Onigiri are perfect any time you want a snack or a side that just hits the spot. So, grab your rice, your skillet, and that secret soy glaze, and let’s make something delicious that’ll have everyone asking for more!
Gather These Ingredients:
This Easy Yaki Onigiri comes together with pantry staples and a few flavor heroes that make all the difference. Here’s what you’ll need:
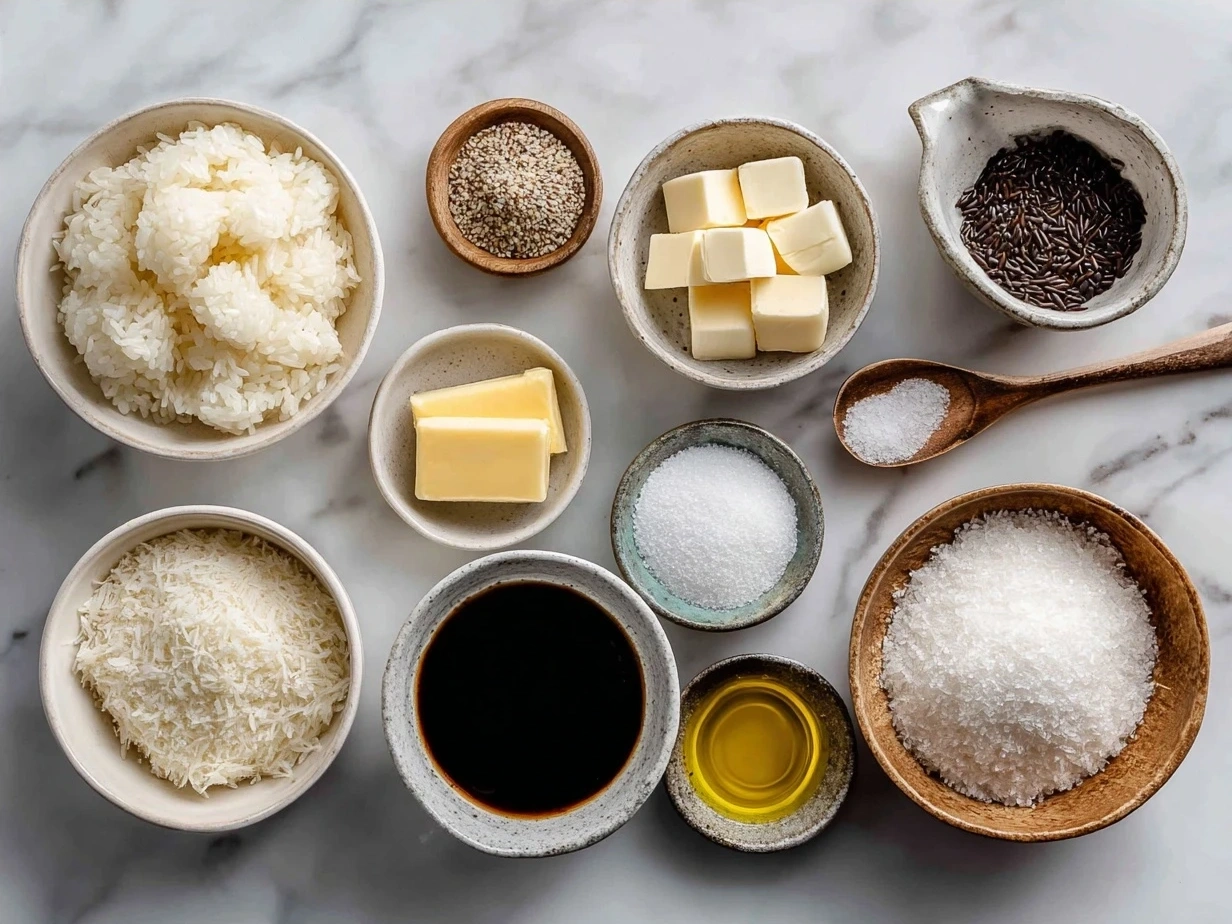
- 2 cups short-grain Japanese rice (uncooked) – the star for that sticky, perfect texture
- 2 ½ cups water – for cooking rice
- 3 tablespoons soy sauce – look for naturally brewed for the best flavor
- 1 tablespoon mirin – adds a subtle sweetness and gloss to your soy sauce onigiri
- 1 teaspoon sugar – to balance the soy sauce’s saltiness
- 1 tablespoon vegetable or sesame oil – for grilling and that crispy crust
- Optional: toasted sesame seeds or furikake – for sprinkling, add extra pop to your grilled rice balls
Want to switch things up in your Easy Yaki Onigiri? Try using tamari instead of soy sauce for a gluten-free version or swap mirin for sake if you have it handy. You can also stir in chopped green onions or small bits of pickled plum (umeboshi) for extra flavor surprises.
Look for Japanese short-grain rice in the international aisle—it really does make a difference here. I always reach for soy sauce with a label showing “naturally brewed” because it tastes richer and less salty.
For quicker prep, use leftover rice cooled to room temperature—it holds up nicely when forming rice balls. This Easy Yaki Onigiri is friendly to batch cooking, so double the rice and keep some for later. I find using chilled rice gives me better control during shaping.
Let’s Make This Happen!
Here’s your step-by-step festival of flavor to craft the perfect Easy Yaki Onigiri, inspired by countless kitchen tests and flaky crust wins. This whole process takes about 30 minutes from start to finish—quick, fun, and totally worth it.
- Cook the rice. Rinse your 2 cups of short-grain rice under cold water until the water runs clear. This removes excess starch and gives flakes a cleaner texture. Combine rinsed rice with 2 ½ cups water in your rice cooker or pot; cook until tender and sticky.
- Mix the glaze. While your rice cooks, whisk 3 tablespoons soy sauce, 1 tablespoon mirin, and 1 teaspoon sugar in a small bowl. Taste this soy sauce onigiri glaze and adjust sweetness or saltiness as you like.
- Shape your rice balls. Once the rice cools just enough to handle (warm but not hot), wet your hands with water to prevent sticking. Scoop about ½ cup rice and press gently into a triangle or round shape. Keep hands wet for smooth shaping.
- Heat your pan. Add 1 tablespoon vegetable or sesame oil to a nonstick skillet over medium heat. Once hot and shimmering, it’s time for rice ball grilling magic!
- Grill the rice balls. Place your rice balls on the pan. Cook for about 4 minutes on one side until a golden, crispy crust forms. Flip carefully with a spatula.
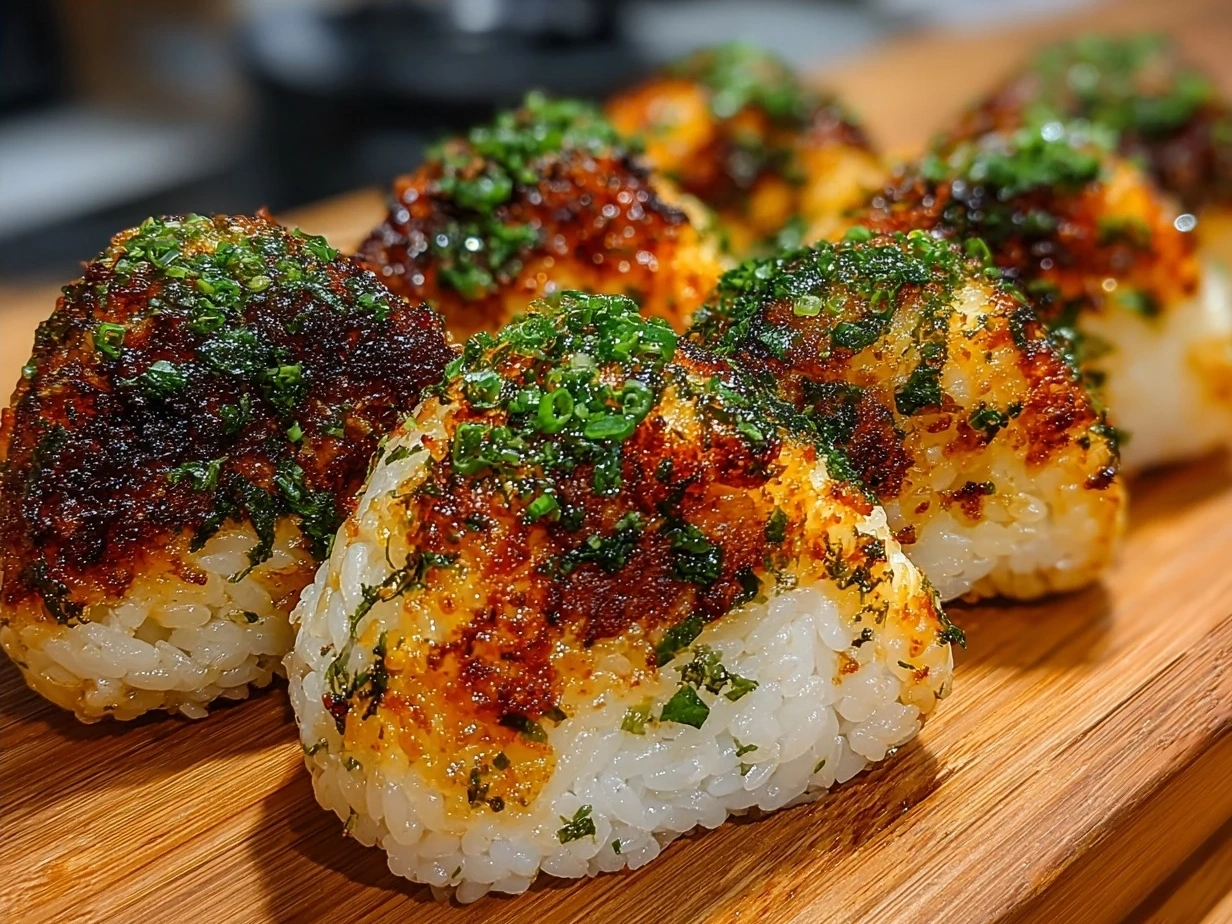
- Glaze and repeat. Brush the exposed side of each rice ball with your soy sauce glaze. Flip again to glaze the other side. Cook another 3-4 minutes per side, brushing one more time for that shiny, caramelized finish.
- Add your finishing touches. If desired, sprinkle toasted sesame seeds or furikake over each grilled rice ball for extra crunch and color.
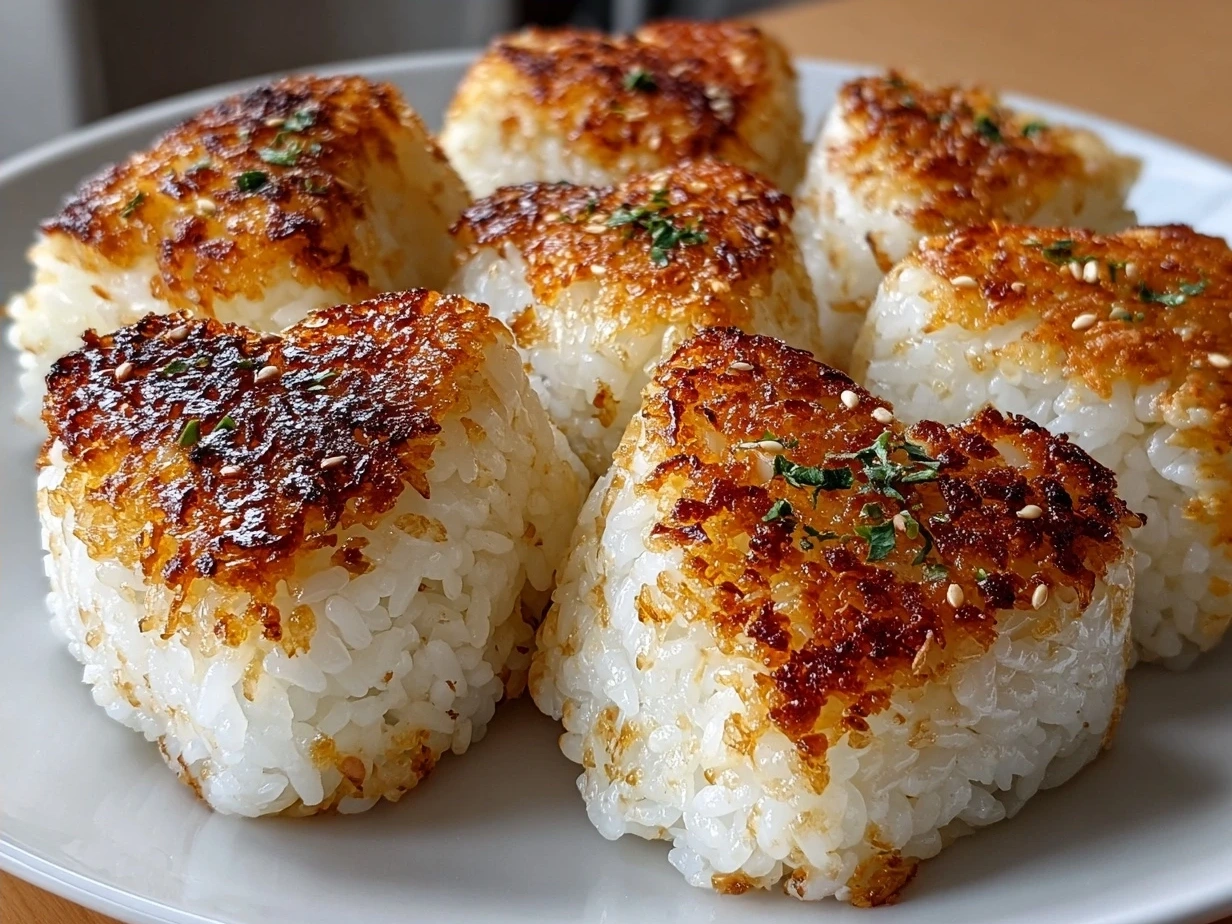
You’ll know your Easy Yaki Onigiri is ready when each side boasts a beautifully browned, crispy surface with a glossy soy glaze. The contrast between crust and rice texture makes every bite a winner.
If your rice balls feel too soft or fall apart, just chill the rice longer or add a tiny pinch of salt when shaping. These easy tweaks help you nail sturdy yet tender grilled rice balls every time!
Pro tip: keep a plate lined with paper towels nearby to rest cooked onigiri. It absorbs any extra oil but keeps those flavors locked in.
This grilling step is where your Easy Yaki Onigiri really becomes crave-worthy—don’t skip it! Plus, cooking in batches means you can keep warm on low heat while grilling friends join the party.
For a visual step-by-step and more insights on rice ball grilling, check out this Yaki Onigiri (Grilled Rice Balls) recipe from Okonomi Kitchen.
Serving Ideas & Pairings!
This Easy Yaki Onigiri pairs beautifully with simple sides that highlight its smoky, savory vibe. My go-to is a crisp cucumber salad or lightly dressed greens for freshness. You can also serve alongside miso soup or a bowl of edamame for a full-flavored Japanese snack spread.
My favorite way to dig into this Easy Yaki Onigiri is on lazy weekends or when I’m feeding a hungry crowd. These grilled rice balls make for a fantastic hand-held treat that’s satisfying and fun to share.
Try plating your Easy Yaki Onigiri with thin nori strips wrapped halfway around or stacked on a bamboo leaf for extra flare. Leftovers? Slice them up and toss into a stir-fry or quick soup for a second meal with minimal effort.
Seasonally, adding some grilled shiso leaves or a drizzle of spicy mayo can take this snack into a new fun zone. Imagine serving Easy Yaki Onigiri with a side of teriyaki salmon avocado rice bowls from one of my favorite recipes for an Asian-inspired feast!
For readers who want to see how this recipe compares and connects to other popular grilled rice ball versions, I love sharing insights from this Crispy Yaki Onigiri Recipe on What Great Grandma Ate, which highlights a slightly different take on rice ball grilling.
Common Questions About This Recipe
Can I prep this Easy Yaki Onigiri in advance? Absolutely! Making rice balls ahead means you can grill them fresh when you’re ready to eat. Store shaped rice balls covered in the fridge for up to 24 hours. Just reheat in a pan or toaster oven to get that crispy crust back.
What can I use instead of mirin in this Easy Yaki Onigiri recipe? If you don’t have mirin, a splash of rice vinegar with a bit of sugar works fine. Or try sake with sugar for similar sweet notes in your soy sauce onigiri glaze.
How do I scale this Easy Yaki Onigiri recipe up or down? It scales beautifully! Just keep your rice-to-water ratio and glaze ingredients balanced. Cooking multiple batches of rice balls means you can feed a crowd or make smaller snack portions.
Can I freeze grilled rice balls? Yep! After grilling and cooling, wrap tightly and freeze. Reheat in a pan or toaster oven straight from frozen. It’s a total game plan for quick snacks or lunchbox treats.
What’s the best pan for rice ball grilling? Nonstick works well for even crisping without sticking. Cast iron is great too if you keep it well oiled. Avoid too-high heat to prevent burning.
How can I add fillings without messing up the Easy Yaki Onigiri process? Try pressing a small indentation in your rice ball before grilling, then filling with cooked seasoned salmon or pickled plum. Seal tightly and grill carefully to prevent fall-apart.
Are there flavor variations you love? Yes! I’ve tested versions with miso glaze instead of soy, butter brushed on while grilling, and even spicy chili flakes added to the glaze. Each delivers a unique twist that keeps this recipe exciting.
If you want a deeper dive on Japanese grilled rice balls and community comments, this Reddit thread on Japan’s grilled rice balls (Yaki Onigiri) is a fascinating read full of tips and stories.
For fans who want to dive into protein-packed meal pairings, you might like my turkey medallions with orange teriyaki sauce—perfect next-level flavors to accompany your onigiri snacks (link).
My Final Take
This Easy Yaki Onigiri recipe has become a total recipe keeper for me, popping into my weekly rotation thanks to its simple yet bold flavor and approachable rice ball grilling method. It’s the snack that’s always ready to surprise and satisfy!
My Top Easy Yaki Onigiri Tips:
– Use slightly warm rice for shaping to get that perfect stick without mush
– Don’t rush the grilling—low and steady heat creates the best crust
– Brush the soy sauce glaze multiple times for a beautiful caramelized finish
I’ve tested it with miso glaze for a deeper savor, a spicy chili twist for heat lovers, and a buttery char for rich comfort. The soy sauce onigiri original definitely gets the most compliments for hitting that smoky-salty-sweet trifecta.
What I love most is how this dish invites playful experimentation in the kitchen without intimidating steps or weird ingredients. It’s proof that grilled rice balls can be both easy and exciting!
If you want more recipes that complement your flavor adventure with Easy Yaki Onigiri, peek at my Teriyaki Salmon Avocado Rice or Turkey Medallions with Orange Teriyaki Sauce.
Ready to get cooking? Trust me, your kitchen and your taste buds will thank you for trying this Easy Yaki Onigiri recipe. Don’t hesitate to make it yours with a little twist or two. Here’s to making food that makes you smile!
Easy Yaki Onigiri

Yaki Onigiri are crispy grilled Japanese rice balls, perfect as a savory snack or side dish with a delightful soy glaze.
- Prep Time: 10 minutes
- Cook Time: 10 minutes
- Total Time: 20 minutes
- Yield: 4 servings
- Category: Snack
- Method: Grilled
- Cuisine: Japanese
Ingredients
- 2 cups cooked Japanese short-grain rice
- 2 tablespoons soy sauce
- 1 tablespoon mirin
- 1 teaspoon sesame oil
- 1 tablespoon vegetable oil (for grilling)
- Optional: sesame seeds for garnish
Instructions
- Wet your hands lightly and shape the cooked rice into triangular or round balls, about 3 inches in diameter.
- Heat vegetable oil in a skillet over medium heat.
- Place the rice balls in the skillet and cook for about 3-4 minutes on each side until a golden crust forms.
- Mix soy sauce, mirin, and sesame oil in a small bowl.
- Brush the soy glaze over each rice ball and continue cooking for 1-2 minutes per side, allowing the glaze to caramelize.
- Remove from heat and optionally sprinkle with sesame seeds before serving.
Notes
For extra flavor, add a small piece of grilled salmon or pickled plum (umeboshi) inside the rice balls before grilling.