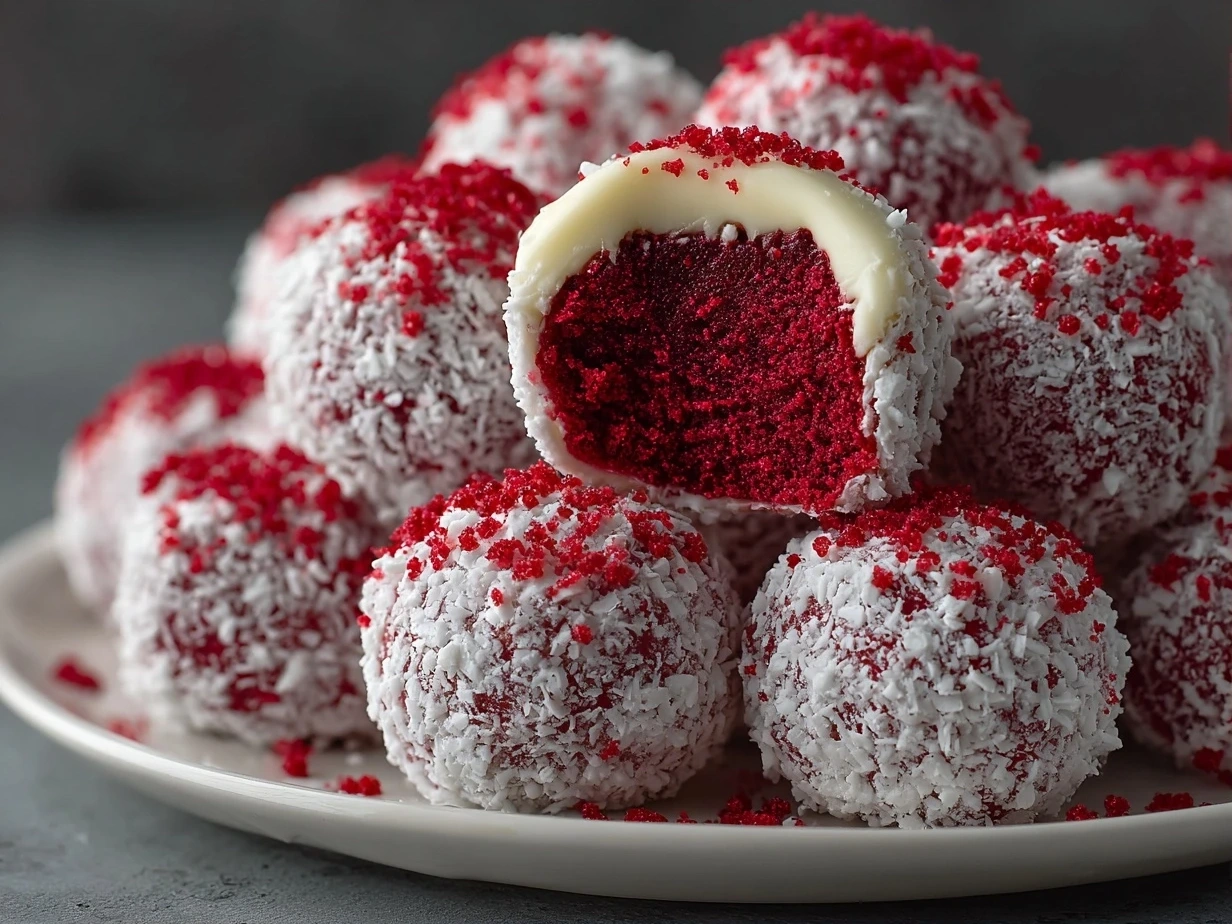
I still remember the exact moment I cracked the code on these No-Bake Red Velvet Snowball Truffles. It started as one of those kitchen experiments where I wanted to combine the rich, velvety charm of red velvet cake balls with the simple, fuss-free magic of no-bake desserts. I crumbled some leftover cake crumbs, mixed them with creamy cheesecake-inspired goodness, and rolled everything into perfectly round, snowy spheres. That first bite hooked me instantly—the lush cocoa flavor mingled with just the right creamy tang, all dusted in a joyful cloud of powdered sugar. This No-Bake Red Velvet Snowball Truffles recipe quickly became a recipe keeper for me.
What makes this version extra special? It’s all about the playful texture contrast—the soft, dense truffle center paired with that delicate, snowy coating—that’s where the magic happens. And since we skip the oven, it’s a sweet treat you can pull together even on a busy day or last-minute holiday bash. I was inspired to keep things simple and approachable, using ingredients you can mostly find in your pantry or easily swap out. Plus, there’s a fun, festive vibe that makes these truffles perfect for gifting or swooning over with friends.
If you’re someone who loves whipping up easy holiday treats with a twist, these No-Bake Red Velvet Snowball Truffles will feel like a joyful flavor adventure. Ready to roll up your sleeves and make some snowball-inspired magic in your kitchen? Let’s jump in and have some fun!
Gather These Ingredients:
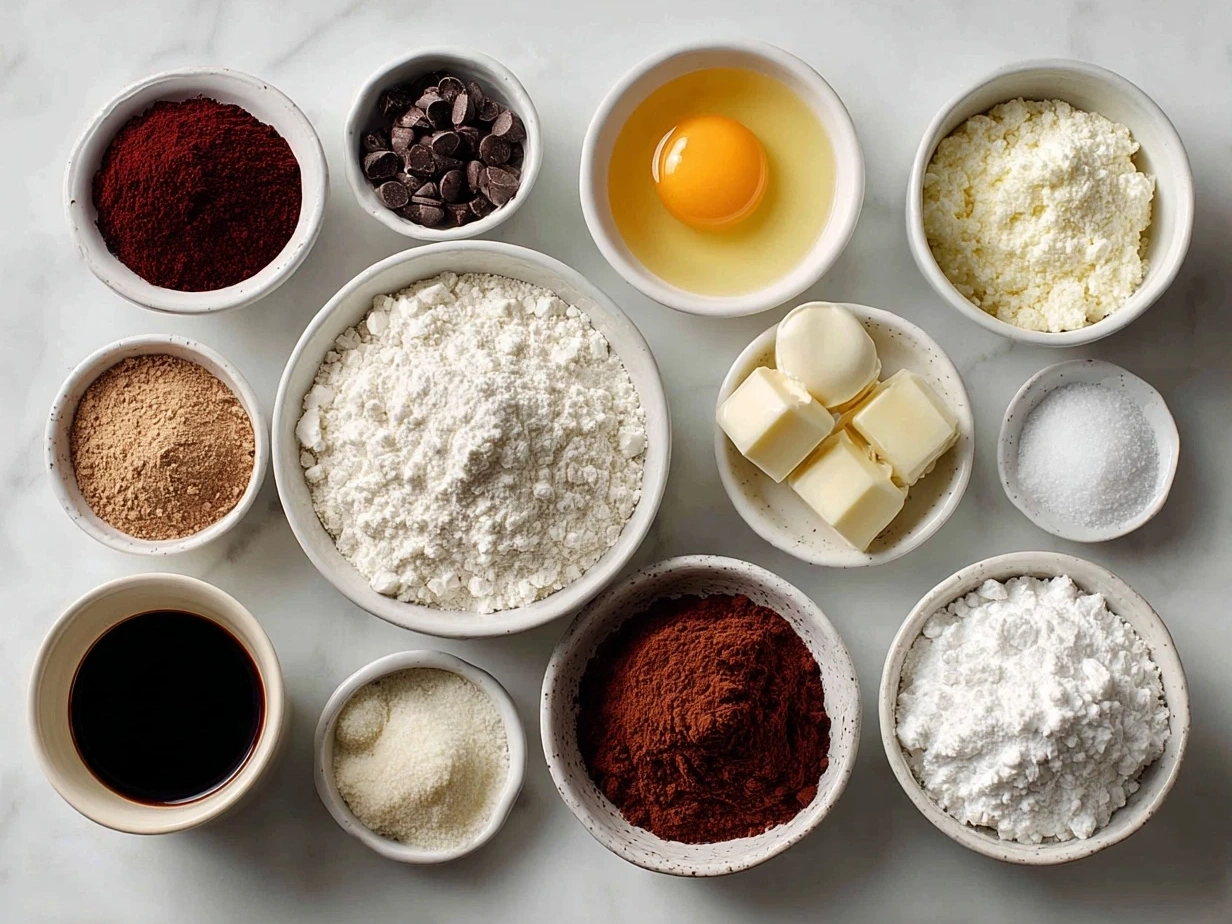
This No-Bake Red Velvet Snowball Truffles comes together with pantry staples and a few flavor heroes that make all the difference. Here’s what you’ll need to get started:
- 1 ½ cups red velvet cake crumbs (homemade or store-bought—if cake isn’t handy, try crushed red velvet cookies for a fun twist)
- 4 oz cream cheese, softened (this brings that creamy tang that makes the truffles irresistible)
- ½ cup powdered sugar (plus extra for dusting)
- 1 teaspoon vanilla extract (look for pure vanilla for the best flavor pop)
- 2 tablespoons unsweetened cocoa powder (this deepens the red velvet’s rich cocoa notes)
- 1 cup white chocolate chips or melting wafers (for coating; if you want to switch things up, try milk chocolate for creaminess or even colored candy melts for festive vibes)
- Pinch of salt (balances the sweetness)
Want to switch things up in your No-Bake Red Velvet Snowball Truffles? Try using vegan cream cheese for a dairy-free option, or swap the white chocolate coating for a dusting of freeze-dried raspberry powder for a tart punch. If you’re hunting for the perfect red velvet cake crumbs, look for this in the international aisle or your local bakery section—sometimes pre-made crumbs show up in specialty baking spots too.
I always reach for cream cheese that’s full-fat and fresh because it really makes the texture lush and smooth. To save time, you can buy ready-made red velvet cake crumbs, but I like crumbly homemade ones for that fresh crumbly feel. If you’re short on time, lining up your ingredients beforehand helps make assembling your No-Bake Red Velvet Snowball Truffles a breeze.
Let’s Make This Happen!
This No-Bake Red Velvet Snowball Truffles takes about 30 minutes from start to finish, and I’m here guiding you through every fun step.
- Start by mixing the base: In a large bowl, combine your red velvet cake crumbs with softened cream cheese. Use a sturdy spatula or clean hands to mix until everything forms a smooth, slightly sticky dough. This is where the magic happens in your No-Bake Red Velvet Snowball Truffles—don’t rush it!
- Add powdered sugar, vanilla, and cocoa: Sift in the powdered sugar and cocoa powder, then pour in vanilla extract. Mix well until you get that luscious, even color and a fragrant, chocolatey aroma that makes you want to dive right in.
- Chill the truffle dough: Pop the dough into the fridge for about 15 minutes. This helps it firm up, so when you roll your No-Bake Red Velvet Snowball Truffles, they hold their shape perfectly without sticking to your fingers like crazy.
- Shape your truffles: Once chilled, scoop small portions and roll them into 1-inch balls. This is a great part—fun, tactile, and oddly satisfying. If your No-Bake Red Velvet Snowball Truffles seem crumbly or dry, just add a little more cream cheese to bring them together.
- Coat in white chocolate: Melt your white chocolate chips gently in the microwave or double boiler, stirring frequently. Dip each truffle into the melted white chocolate, then place them on parchment paper. Pro tip: use a fork or dipping tool to keep it neat.
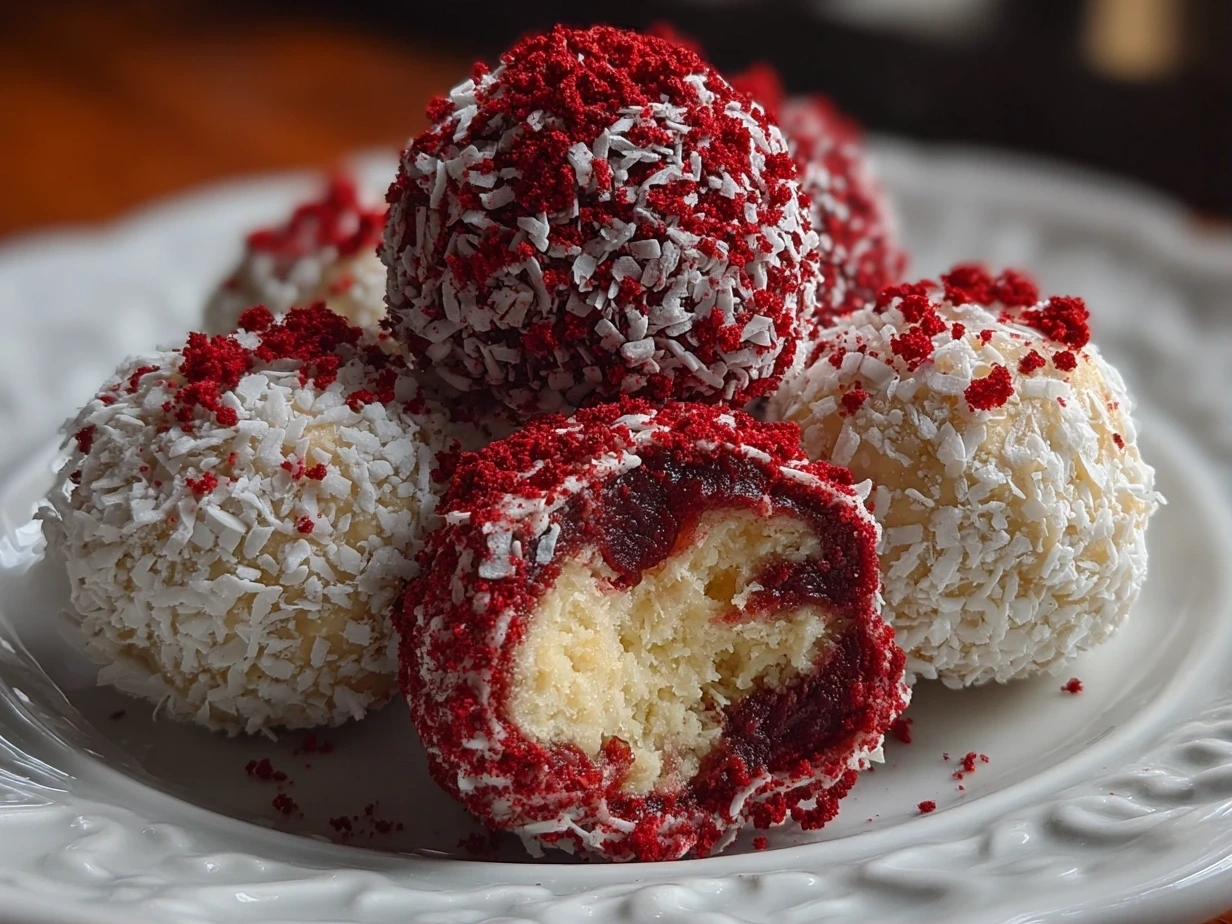
- Dust with powdered sugar: Before the coating sets, sprinkle your truffles generously with powdered sugar for that signature snowball look. You’ll know your No-Bake Red Velvet Snowball Truffles is ready when the coating is firm but still glossy.
- Chill before serving: Let them chill for at least 20 minutes or until set. Meanwhile, prep your serving plates or wrap some up as festive gifts.
From my recipe testing, I learned that refrigeration time is key—skip it, and your No-Bake Red Velvet Snowball Truffles might be a bit soft to handle. And if you’re craving a flavor boost, try swirling in a little cream cheese frosting or a pop of espresso powder into your dough mix for a grown-up twist.
These little red velvet cake balls, wrapped in a snowy coat, will have everyone asking for the recipe!
Serving Ideas & Pairings!
This No-Bake Red Velvet Snowball Truffles pairs beautifully with simple sides like fresh berries or a dollop of whipped cream if you’re feeling fancy. I love serving these during holiday get-togethers or as a surprise midday pick-me-up—their festive look always brings big smiles.
For a drink pairing, a hot cup of spiced chai or rich coffee complements the creamy cocoa flavors perfectly. On lazy weekends or when I’m feeding hungry friends, I love plating these snowball truffles with a sprinkle of crushed pistachios or even a drizzle of caramel for extra flair.
If you have leftovers (and yep, that sometimes happens!), they freeze really well—just pop them in an airtight container and thaw an hour before eating. You can also mix them into ice cream or crush to top your morning yogurt bowl for a creative twist.
When I first shared these on Facebook, groups like this cozy cookie buffet community went crazy for them. If you want more festive ball and truffle inspiration, check out Lord Byron’s Christmas ball collection—these No-Bake Red Velvet Snowball Truffles fit right in with those crowd favorites.
Thinking of exploring more red velvet delights? You’ll want to peek at my Red Velvet Cream Cheese Bundt Cake for another taste sensation.
Common Questions About This Recipe
Can I prep this No-Bake Red Velvet Snowball Truffles in advance?
Absolutely! These truffles keep beautifully in the fridge for up to a week and freeze well for a month. I like to make them a day ahead so flavors meld and the texture firms up just right.
What can I use instead of cream cheese in this No-Bake Red Velvet Snowball Truffles?
I’ve experimented with mascarpone and even softened butter. Mascarpone gives a milder, creamier texture but can be a bit richer. Butter works in a pinch but changes the flavor and texture noticeably, so I recommend sticking with cream cheese for best results.
How do I scale this No-Bake Red Velvet Snowball Truffles recipe up or down?
Scaling is easy—just double or halve the ingredients! For larger batches, chilling the dough longer helps keep things manageable. If you’re throwing a big party, these truffles are a lifesaver because they’re quick, no bake, and irresistible.
Can I make these dairy-free?
Yes! Use a dairy-free cream cheese and substitute the white chocolate coating with dairy-free melts or even a cocoa dusting. I tested a few vegan versions, and they hold shape well, though flavor shifts slightly.
What’s the best way to get perfectly round No-Bake Red Velvet Snowball Truffles?
I recommend chilling your dough well, then rolling between your palms gently but firmly. If the dough is sticky, dust your hands lightly with powdered sugar. A small cookie scoop also helps make uniform balls.
Can I add mix-ins to these truffles?
Definitely! Chopped nuts, mini chocolate chips, or a swirl of your favorite frosting all work. When adding extras, keep the dough slightly chilled so it holds together.
What’s the trick to the perfect white chocolate coating?
Melting slowly and stirring often is key. I use a gentle microwave method in short bursts or a double boiler. If your white chocolate is too thick, a splash of coconut oil thins it out without changing flavor.
How should I store leftover No-Bake Red Velvet Snowball Truffles?
Store in an airtight container in the fridge. For longer storage, freezing is your friend—just thaw before eating. They also travel well if wrapped and kept cool!
If this recipe speaks to you, you’ll want to try my fun Jam Donut Focaccia for another easy holiday treat with a sweet twist.
My Final Take
This No-Bake Red Velvet Snowball Truffles recipe earned its rightful spot on MilaBites because it checks all my boxes: easy, fun, and incredibly delicious. It’s a no-fuss holiday treat that delivers big flavor without demanding hours in the kitchen or fancy ingredients. I adore how the creamy tang of cream cheese pairs with the luscious cocoa crumb base, all wrapped in a snowy white chocolate hug.
My Top No-Bake Red Velvet Snowball Truffles Tips:
– Chill your dough well before rolling—it makes the experience way smoother.
– Use good-quality cream cheese for that rich, smooth center.
– Don’t skip the powdered sugar dusting! It gives the signature snowball look and a touch of sweetness.
I’ve tested three variations I love: one with a hint of espresso powder stirred into the dough for grown-up flavor; another version swapping white chocolate for dark chocolate for a bittersweet edge; and a fun twist where I added crushed peppermint candy to the outside for a holiday sparkle. The classic white chocolate coated red velvet cake balls get the most compliments every time—they’re a real crowd favorite.
I encourage you to play around with this recipe, maybe try swapping the coating or adding your own favorite mix-ins. That’s the best part about these No-Bake Red Velvet Snowball Truffles—the simple base is your canvas for a delicious flavor adventure.
Give these truffles a try and watch your kitchen fill with happy smiles and sweet moments. You’ve got this!
For more recipe inspiration, don’t miss the From no-bake fudge and truffles to spiced cakes and chewy cookies collection—perfect if you’re into easy, crowd-pleasing sweets like these truffles.
Thanks so much for cooking along with me! I can’t wait to hear how your No-Bake Red Velvet Snowball Truffles turn out.
No-Bake Red Velvet Snowball Truffles
Delight in these rich and creamy No-Bake Red Velvet Snowball Truffles, perfect for a festive treat or elegant dessert with a luscious cream cheese center and a dusting of powdered sugar.
- Prep Time: 15 minutes
- Cook Time: 0 minutes
- Total Time: 30 minutes
- Yield: 20 truffles
- Category: Dessert
- Method: No-Cook
- Cuisine: American
Ingredients
- 1 1/2 cups red velvet cake crumbs
- 4 oz cream cheese, softened
- 1 cup white chocolate chips
- 1 teaspoon vanilla extract
- 1 cup powdered sugar, for dusting
- Optional: extra red food coloring for a vibrant hue
Instructions
- In a medium bowl, mix the red velvet cake crumbs and softened cream cheese until well combined and smooth.
- Form the mixture into 1-inch balls and place them on a parchment-lined baking sheet.
- Freeze the cake balls for 15 minutes to firm up.
- Melt the white chocolate chips in a microwave-safe bowl in 30-second intervals, stirring in between until smooth.
- If desired, add a few drops of red food coloring to the melted white chocolate and stir well.
- Using a fork or skewer, dip each cake ball into the melted chocolate, ensuring it is fully coated.
- Place the coated truffles back on the parchment paper and let them set at room temperature or refrigerate for 10 minutes.
- Once set, generously dust the truffles with powdered sugar to create the snowball effect.
- Store the truffles in an airtight container in the refrigerator until ready to serve.
Notes
For an extra festive touch, sprinkle crushed peppermint candy on top of the chocolate coating before it sets.